What Are the Little Black Bugs in My Bird Seed: Causes, Identification, and Prevention
Finding tiny black insects in your bird seed can be both frustrating and concerning. These small pests not only contaminate the food you provide for your backyard birds but can also affect the quality and shelf life of the seed. Observing your bird feeder regularly and maintaining clean storage practices helps in managing these unwelcome visitors.
What are the little black bugs in my bird seed is a question many bird owners ask when they notice tiny crawling insects among sunflower seeds, millet, or other common bird feed. These bugs are often attracted to dry seeds and can multiply quickly in warm, humid conditions.
Identifying the type of bug is important for determining the best control method. Different species, such as weevils, beetles, or mites, behave differently and require slightly varied approaches to prevent infestations.
Understanding why these insects appear in bird seed can also help you prevent future problems. Factors such as moisture, improper storage, and older seed batches increase the likelihood of infestations.
By learning how to identify and manage these bugs, you can ensure that your bird seed remains safe, fresh, and appealing to your feathered visitors, keeping your backyard birds healthy and happy.
Common Types of Pests Found in Bird Seed
Bird seed is a magnet for several types of pests, especially when stored improperly or left in feeders for too long. These pests not only spoil the food but can also spread mold, bacteria, or disease that may harm your backyard birds. Identifying the common types of pests found in bird seed helps you take preventive measures and maintain a safe feeding environment for your feathered visitors.
Grain Weevils
Grain weevils are one of the most common pests found in bird seed. These tiny black or brown beetles are often less than a quarter-inch long but can cause significant damage by burrowing into seeds to lay their eggs. The larvae feed inside the seeds, hollowing them out and reducing the overall nutritional value.
Weevils thrive in warm, dry environments and can reproduce quickly, making an infestation challenging to control once it begins. You might notice tiny holes in seeds or adult beetles crawling around your seed storage containers. To prevent weevils, store bird seed in airtight containers, keep it in a cool, dry place, and avoid purchasing old or improperly packaged seed.
Regularly cleaning feeders and removing leftover seeds also reduces the chances of a weevil population taking hold. Observing seeds carefully before adding them to feeders helps identify any early signs of infestation. Prompt action can protect both the seed and the birds consuming it.
Indian Meal Moths
Indian meal moths are another frequent pest in bird seed. These small moths have reddish-brown wings and lay eggs that hatch into tiny larvae, which feed on the grains, causing seeds to clump together or appear webbed. The larvae are cream-colored with brown heads and can be difficult to spot until they have spread throughout the seed supply.
The presence of webbing or small, moving worms is a clear sign of infestation. Indian meal moths reproduce rapidly, so an unnoticed problem can escalate quickly. Preventive measures include keeping bird seed in airtight containers, regularly rotating old stock, and storing seed away from warm areas where moths thrive.
Cleaning the storage area thoroughly before refilling containers is critical, as eggs or larvae may remain even after infested seeds are removed. Using these practices helps maintain fresh, uncontaminated seed and protects the health of your backyard birds.
Flour Beetles
Flour beetles, including red and confused flour beetles, can infest bird seed, especially fine-grained mixes like millet or sunflower hearts. These small, reddish-brown beetles feed on seeds and create dust-like residue, reducing the quality and appeal of the feed. Flour beetles are highly adaptable and can survive in both storage and feeders.
Infested seeds may smell slightly musty or sour, indicating bacterial or fungal contamination. The beetles reproduce rapidly, so early detection is key. Storing seed in sealed containers, inspecting it before use, and keeping feeders clean help prevent infestations. Additionally, shaking or sifting seeds before adding them to feeders can help remove any hidden beetles or debris.
Understanding the lifecycle of flour beetles is helpful in preventing future problems. Adult beetles live for several months and can lay hundreds of eggs in seed storage, making long-term storage without proper precautions risky. Regular maintenance and monitoring are essential for keeping bird seed pest-free.
Mites
Mites are tiny, almost microscopic pests that can infest bird seed, especially in humid conditions. They often appear as small black, red, or brown specks crawling through seed. While mites are less destructive than beetles or moths, they can contaminate seed and cause irritation to both birds and humans if they spread.
Mites feed on broken seed pieces, dust, and organic debris, thriving in areas where seed has been left exposed for long periods. Proper storage in airtight, dry containers and cleaning feeders regularly are crucial to preventing infestations. In some cases, mites may be visible moving in clusters, but thorough inspection is often required due to their tiny size.
Maintaining low humidity and cooler storage conditions helps prevent mite populations from establishing. Frequent rotation of seed and avoiding accumulation of old, leftover feed can minimize the likelihood of mites becoming a problem. Being proactive ensures that your bird seed remains clean, nutritious, and safe for wildlife.
Sawtoothed Grain Beetles
Sawtoothed grain beetles are slender, dark brown pests with serrated edges on their bodies that allow them to easily crawl through tiny gaps in packaging or storage containers. These beetles consume a wide range of grains and seeds, making them a common concern in bird seed. Infested seeds may appear slightly hollowed or dusty, and adult beetles may be seen moving among the seed.
These beetles reproduce rapidly, with females laying dozens of eggs in each container. Proper storage, such as keeping seed in sealed, hard-sided containers and avoiding prolonged exposure to warm environments, helps prevent infestations. Shaking and inspecting seeds before filling feeders can catch beetles early.
Sawtoothed grain beetles are resilient and can survive in various storage conditions, making regular monitoring essential. Addressing an infestation quickly prevents the population from spreading and ensures your bird seed remains safe, high-quality, and attractive to birds.
Preventing Pests in Bird Seed
Preventing pests is often easier than eliminating them. Using airtight containers, storing seed in cool, dry areas, and regularly rotating stock reduces the likelihood of infestations. Cleaning feeders and storage areas removes leftover seeds and debris that attract pests.
Visual inspection of seeds before purchase or use helps detect early signs of pests, such as holes, webbing, or tiny crawling insects. Freezing new seed batches for a few days can kill eggs or larvae before they have a chance to establish. By combining these preventive strategies, you can maintain fresh, pest-free bird seed that supports the health and enjoyment of your backyard birds.
How Bugs Get Into Bird Seed
Understanding how bugs get into bird seed is essential for preventing infestations and keeping your feeders safe for birds. Insects can enter seed during storage, transportation, or even directly at feeders. By identifying the pathways and conditions that attract pests, you can take proactive steps to protect your bird seed and maintain a healthy feeding environment for your backyard wildlife.
Contamination During Production and Packaging
Bugs often enter bird seed at the production or packaging stage. Seeds are harvested from fields where insects are naturally present, and without proper cleaning or treatment, eggs, larvae, or adult pests can remain in the product. Even sealed bags may contain tiny, undetected pests.
Transport and storage prior to reaching retail stores can also contribute to contamination. Warm warehouses or prolonged storage periods create ideal conditions for insects like weevils, beetles, and moths to survive and reproduce. When you purchase bird seed, inspecting the bag for holes, webbing, or movement is important, as early signs of contamination may already be present.
Manufacturers implement cleaning processes and sometimes fumigation to reduce insect populations, but no method is 100% effective. Understanding that bugs can arrive before the seed even reaches your home helps explain why infestations sometimes appear quickly.
Improper Storage at Home
Once bird seed is in your home, improper storage is a common way insects gain access. Open bags, humid environments, and warm temperatures provide ideal conditions for pests like grain beetles, flour beetles, and mites to thrive. Moisture is particularly problematic, as damp seeds can attract insects and encourage mold growth.
Storing seed in airtight containers, preferably made of plastic or metal, helps block pests and reduces exposure to humidity and fluctuating temperatures. Avoiding storage in garages, sheds, or basements that experience heat or moisture spikes further minimizes the risk. Labeling and rotating seed also prevents old batches from becoming infested over time.
Even brief exposure during feeding can allow bugs to enter. Small gaps in containers or repeated opening of seed bags can create opportunities for insects to lay eggs, making vigilance essential to maintain a pest-free supply.
Contamination at Feeders
Bird feeders themselves can be entry points for insects. Leftover seed, spilled grains, or organic debris around the feeder attracts pests. Weevils, beetles, and moths may lay eggs in these areas, which then migrate back into fresh seed.
Outdoor feeders are particularly vulnerable to temperature fluctuations and humidity, which create conditions conducive to insect development. Regular cleaning of feeders, removal of old seed, and placement of feeders in shaded, dry areas help prevent infestations. Using trays or feeder designs that minimize spillage can also reduce the likelihood of bugs accessing the seed.
By maintaining cleanliness and monitoring feeders, you can stop small infestations from growing into major problems. Frequent inspection of both feeders and seed storage containers is key to preventing the spread of insects.
Environmental Factors That Attract Bugs
Environmental conditions play a significant role in how bugs get into bird seed. Warm temperatures accelerate insect development, while high humidity provides moisture that encourages reproduction. Poor ventilation and stagnant air in storage areas also create ideal habitats for pests.
Insects are naturally drawn to grains, and bird seed is a concentrated food source. Even brief exposure to infested areas, such as outdoor porches or garages, can introduce pests. Monitoring environmental conditions, controlling moisture, and maintaining proper airflow in storage spaces are essential for minimizing bug infestations.
Being aware of environmental risk factors helps you take preventive measures, such as storing seed in cool, dry places, checking bags before opening, and using airtight containers. Reducing exposure to these conditions limits the opportunities for bugs to enter bird seed.
Preventive Measures and Best Practices
Preventing bugs from entering bird seed requires a combination of careful storage, inspection, and maintenance. Always store seed in sealed containers, keep it away from damp or warm locations, and rotate older batches to ensure freshness. Cleaning feeders regularly and removing spilled seeds prevents insects from reproducing in feeding areas.
Inspecting new seed for signs of pests before adding it to feeders is also critical. Freezing seed for a few days can kill eggs or larvae present in the bag. By understanding how bugs get into bird seed and implementing these preventive strategies, you can ensure your birds receive clean, safe, and nutritious food while avoiding infestations.
Signs of Infestation
Detecting an infestation in bird seed early is crucial to protect both your seed supply and the health of your backyard birds. Insects can spread rapidly, contaminating seeds and feeders. Recognizing the signs of infestation allows you to act quickly, preventing widespread damage and ensuring that your birds continue to have access to safe, nutritious food.
Visible Bugs in Seed
The most obvious sign of infestation is the presence of visible insects in the seed. You might notice tiny black, brown, or reddish beetles, crawling weevils, or small moths in or around the feeder. These bugs can often be seen moving through the grains or perched on the seed surface.
Larvae are another clear indicator. Cream-colored or light brown larvae may feed inside seeds, leaving them hollowed or damaged. They often appear as tiny worms or grubs, sometimes accompanied by webbing or dust-like residue. Observing these pests during daily feeding checks helps you identify the problem before it spreads further.
Regular inspection of both the seed and feeder is essential. Even a few insects can quickly multiply under favorable conditions, so spotting them early allows you to take action and protect both new and stored seed.
Webbing and Silk
Some pests, such as Indian meal moths, leave noticeable silk or webbing in the seed. This fine, sticky material can entangle grains, creating clumps that are unappealing to birds. Webbing may appear as white or gray threads scattered throughout the feeder or storage container.
Larvae often spin this silk while feeding, which traps seed dust and waste. The presence of webbing signals that eggs have hatched and the infestation is already active. This type of evidence is particularly concerning because it indicates that the pests are reproducing and can spread quickly throughout your seed supply.
Examining feeders and storage containers for webbing helps detect these moths early. Removing affected seed and thoroughly cleaning containers can limit the infestation, preventing further contamination and protecting the health of your birds.
Damaged or Hollowed Seeds
Infested bird seed may show physical signs of damage. Seeds may appear hollowed, have small holes, or be partially eaten by larvae. This damage reduces the nutritional value and attractiveness of the seed, potentially discouraging birds from feeding.
You may also notice powdery residue or “frass” — a combination of insect droppings and seed dust — at the bottom of feeders or containers. This accumulation signals active feeding and can spread contaminants throughout the seed supply. Regularly inspecting seeds for these subtle clues allows you to catch infestations that may not be immediately visible.
Damaged seeds are often accompanied by a slight odor, such as mustiness or sourness, indicating bacterial or fungal growth. These changes are warning signs that immediate action is necessary to protect both your seed and the birds consuming it.
Changes in Seed Color or Texture
Another sign of infestation is a noticeable change in seed color or texture. Infested seeds may appear discolored, dull, or dusty compared to fresh, healthy seed. The surface may feel sticky or clumpy due to moisture or silk produced by insect larvae.
Color changes often indicate early feeding damage, mold growth, or contamination from insect waste. Birds may avoid feeding on these seeds, signaling that the quality has deteriorated. Observing subtle differences in seed appearance helps you detect problems before they become severe.
Monitoring the texture and consistency of your seed during storage and before placing it in feeders is important. Fresh seeds should flow freely and maintain their natural color, whereas clumping, powder, or unusual softness may indicate a developing infestation.
Behavioral Clues from Birds
Birds themselves can provide clues about infestations. If they suddenly avoid a feeder or appear disinterested in the seed, it may be a sign that the seed is contaminated or infested. Birds are highly sensitive to changes in taste, texture, and smell.
Unusual feeding behavior, such as picking through seed or discarding grains, can indicate the presence of pests. Observing these patterns helps you detect issues even before visible bugs or damage appear. Combining behavioral observations with physical signs of infestation allows for more accurate and early detection.
Being proactive in monitoring both seed and bird behavior ensures that infestations are caught early. Promptly removing contaminated seed and cleaning feeders helps maintain a healthy feeding environment for your backyard birds.
Risks to Birds and Pets
Contaminated bird seed poses several risks to birds and pets, ranging from minor digestive issues to serious health problems. Infested or moldy seeds can carry bacteria, fungi, and toxins that may harm wildlife and domestic animals. Understanding these risks helps you take preventive measures to maintain a safe feeding environment and protect the health of all animals that consume the seed.
Health Risks from Ingesting Contaminated Seed
Birds consuming infested seed may ingest insects, larvae, or mold, which can lead to digestive upset or more severe health complications. Insects such as weevils or beetle larvae can carry bacteria or fungal spores, increasing the risk of infections. Moldy seed often contains mycotoxins, which are harmful chemical compounds that can damage the liver, kidneys, or nervous system in both birds and pets.
Signs of distress in birds may include lethargy, decreased appetite, vomiting, or abnormal droppings. Small pets, such as hamsters or squirrels, that occasionally eat bird seed may show similar symptoms. Promptly identifying and removing contaminated seed reduces the chance of illness and ensures that your birds and pets continue to receive safe, nutritious food.
Choking and Physical Harm
Infested seed can also pose a physical risk. Insects, larvae, and debris mixed with seeds may be difficult for birds or pets to swallow properly, increasing the likelihood of choking. Small seeds partially eaten or damaged by pests can splinter, creating sharp edges that may injure a bird’s digestive tract or the mouth of a pet.
Additionally, certain insects, such as large beetles or caterpillars, can be difficult for smaller birds to handle. Birds may attempt to feed on them and struggle to consume them entirely, leading to feeding frustration or physical harm. Regular inspection of seed for debris and pest activity minimizes these risks.
Physical hazards are particularly concerning for young, inexperienced, or smaller birds. Removing affected seed and keeping feeders clean ensures that the food remains safe and easily consumable for all wildlife.
Risk of Disease Transmission
Infested bird seed can act as a vector for disease. Bacteria, mold, and parasites carried by insects may spread to birds or pets consuming the seed. For example, salmonella, a common bacterial pathogen, can develop in moist or contaminated seed and cause severe illness in both birds and mammals.
Parasites carried by pests, such as mites or larvae, may also transfer to birds during feeding. These organisms can irritate the skin, transmit infections, or weaken the immune system over time. Maintaining proper storage, cleaning feeders, and discarding contaminated seed are essential practices for minimizing disease risks.
Environmental contamination from infested seed can extend beyond the feeder. Birds that visit multiple feeders or forage on the ground may spread pathogens to other wildlife or pets, making early detection and intervention critical for overall safety.
Long-Term Health Effects
Chronic exposure to contaminated seed may have long-term consequences. Birds consistently eating infested or moldy seed may experience malnutrition due to damaged grains and reduced nutrient intake. Over time, this can affect growth, feather quality, reproductive success, and overall vitality.
Pets that occasionally consume compromised seed may also experience cumulative effects, such as organ damage or weakened immunity. Preventing exposure through careful inspection, proper storage, and regular cleaning reduces the likelihood of long-term health issues and supports the well-being of all animals in your care.
Preventive Measures to Protect Birds and Pets
Preventing health risks requires vigilance in storage and maintenance. Always store bird seed in airtight containers, rotate older stock, and avoid damp or humid environments. Regularly clean feeders to remove leftover seed, insects, and debris.
Monitoring both seed quality and animal behavior helps detect problems early. Observing birds and pets for signs of distress can provide important clues that contaminated seed is present. By taking proactive steps, you can ensure that your feeders provide safe, nutritious food and minimize potential health hazards.
Prevention and Proper Storage
Proper storage and preventive measures are the most effective ways to keep bird seed free from pests and contamination. Maintaining a clean, dry environment, using appropriate containers, and regularly inspecting seed can protect both your feeders and the health of birds. Understanding best practices for prevention helps ensure that your bird seed remains fresh, safe, and nutritious.
Choosing the Right Storage Containers
Selecting the proper storage container is essential to prevent pests from accessing bird seed. Airtight containers made of plastic, metal, or heavy-duty glass are ideal, as they block insects and limit moisture exposure. Avoid using thin bags or cardboard boxes, which can be easily breached by small bugs or rodents.
Sealing the container completely after each use helps maintain freshness and prevents insects from entering. Some containers also come with tight-fitting lids or locking mechanisms to provide additional protection. Using containers that are easy to clean and disinfect is beneficial, as residue from old seed can attract pests over time.
Labeling containers with the purchase date and type of seed allows you to rotate stock efficiently. By keeping older seed separate and using it first, you reduce the chance of prolonged storage that often leads to infestations. Proper containers are the first line of defense in maintaining pest-free bird seed.
Maintaining a Dry and Cool Environment
Moisture is a major factor in pest infestations. Storing bird seed in a cool, dry location slows the growth of insects, mold, and bacteria. Avoid storing seed in humid basements, garages, or areas exposed to direct sunlight, as fluctuating temperatures can create condensation inside containers.
Placing containers on shelves off the floor reduces exposure to moisture and helps prevent accidental contamination. Using desiccant packets or moisture-absorbing materials in large storage bins can also help maintain dryness. Regularly checking for condensation or dampness allows you to address potential issues before pests take hold.
Cool storage also helps extend the shelf life of seeds. Temperature control prevents premature spoilage and reduces the metabolic activity of insects that may already be present in small numbers, slowing reproduction and keeping seed fresh longer.
Regular Cleaning and Inspection
Cleaning feeders and storage areas is vital for preventing infestations. Leftover seed, husks, and debris can attract insects and provide breeding grounds. Empty feeders periodically, wash them with warm, soapy water, and allow them to dry completely before refilling.
Inspect stored seed for visible pests, webbing, or unusual odor. Small signs of infestation, such as tiny crawling insects or dust-like residue, should be addressed immediately. Discard any contaminated seed rather than attempting to salvage it, as doing so prevents the spread of pests to other batches.
Maintaining a cleaning schedule reduces the likelihood of repeated infestations. Combine this with regular rotation of seed and thorough inspection of new purchases to keep your bird feeding area hygienic and safe.
Freezing or Treating Seed Before Storage
Freezing bird seed for several days before storage can eliminate eggs, larvae, or adult pests that may already be present. This method is especially useful for large batches or older seed that may have been stored for some time.
Some bird owners also use heat treatment, such as baking seed at low temperatures, to kill pests without damaging the nutritional quality. These preventive treatments complement proper storage practices and reduce the risk of infestations significantly.
Combining freezing or treatment with airtight containers and cool, dry storage ensures that seed remains fresh and safe. Regularly monitoring and implementing preventive measures is key to maintaining a reliable supply of pest-free bird seed.
Best Practices for Long-Term Storage
To maximize effectiveness, rotate seed regularly and avoid accumulating large quantities for extended periods. Store only what you expect to use within a few months, and always purchase seed from reputable suppliers.
Keep storage areas clean, dry, and well-ventilated, and maintain airtight containers for all types of seed. Inspect both containers and feeders frequently for early signs of pests. By implementing these long-term storage strategies, you can prevent contamination, protect the health of your birds, and enjoy a consistent supply of fresh, nutritious seed year-round.
How to Safely Remove Bugs
Removing bugs from bird seed requires careful handling to ensure the seed remains safe for birds and pets. Infested seed can harbor insects, larvae, and even mold, making it important to take proper precautions. By following effective removal methods, you can maintain a clean, pest-free feeding environment while minimizing risks to wildlife.
Inspecting and Isolating Infested Seed
The first step in safely removing bugs is to identify and isolate the affected seed. Carefully inspect your seed for visible insects, larvae, webbing, or unusual residue. Using a bright light or magnifying glass can help detect smaller pests that are difficult to see with the naked eye.
Once infested seed is located, remove it from the storage container or feeder to prevent pests from spreading. Place the contaminated seed in a separate container or bag for disposal or treatment. This isolation step is critical for protecting both the remaining seed and your feeders, reducing the risk of a larger infestation.
Taking notes on the type of pest and extent of infestation can also guide you in choosing the appropriate removal method. Prompt action prevents further contamination and ensures that fresh seed remains safe for consumption.
Freezing or Heating to Eliminate Bugs
One effective method for safely removing bugs from bird seed is freezing. Place the infested seed in a sealed plastic bag and freeze it for at least 48 to 72 hours. Freezing kills adult insects, eggs, and larvae without introducing chemicals that could harm birds.
Heat treatment is another option. Spread the seed in a thin layer on a baking sheet and bake it at a low temperature for 20 to 30 minutes. Ensure the temperature is carefully controlled so the seed does not burn or lose nutritional value. Both freezing and heating provide safe alternatives to chemical treatments and maintain the seed’s quality.
After treatment, allow the seed to cool completely before storing it in an airtight container. These methods eliminate pests while keeping the seed safe and appealing for your backyard birds.
Sifting and Manual Removal
For smaller infestations, sifting or manually removing insects can be effective. Use a fine mesh sieve or strainer to separate visible bugs from the seeds. Gently shaking or tapping the sieve helps remove larvae, adult insects, and debris.
This method works well for seeds like sunflower, millet, or mixed bird feed. While time-consuming, sifting allows you to salvage most of the seed without exposing it to extreme temperatures or chemicals. Inspect the sifted seed carefully for any remaining pests before returning it to feeders or storage.
Manual removal should always be followed by proper storage in airtight containers to prevent reinfestation. Combining sifting with freezing or heating provides an extra layer of protection for your birds.
Cleaning Feeders and Surrounding Areas
After removing bugs from the seed, it’s essential to clean feeders and surrounding areas. Wash feeders with warm, soapy water and allow them to dry completely. Remove spilled seed, husks, and debris from the ground or feeding trays.
Regular cleaning helps prevent pests from returning and reduces the likelihood of residual eggs or larvae remaining in feeders. Disinfecting surfaces near the feeding area can also minimize the risk of contamination. Maintaining a clean feeding environment is as important as treating the seed itself, ensuring that birds have access to safe, nutritious food.
Safe Disposal of Contaminated Seed
Seed that is heavily infested or moldy should be discarded safely. Place it in a sealed bag and dispose of it in outdoor trash to prevent pests from spreading back into storage areas or nearby feeders. Avoid composting contaminated seed, as this may attract pests and further propagate the problem.
Using these safe disposal methods, along with the preventive measures, helps maintain a clean and healthy feeding environment. By combining inspection, treatment, manual removal, and proper cleaning, you can effectively remove bugs and ensure your birds have access to fresh, safe seed.
Frequently Asked Questions
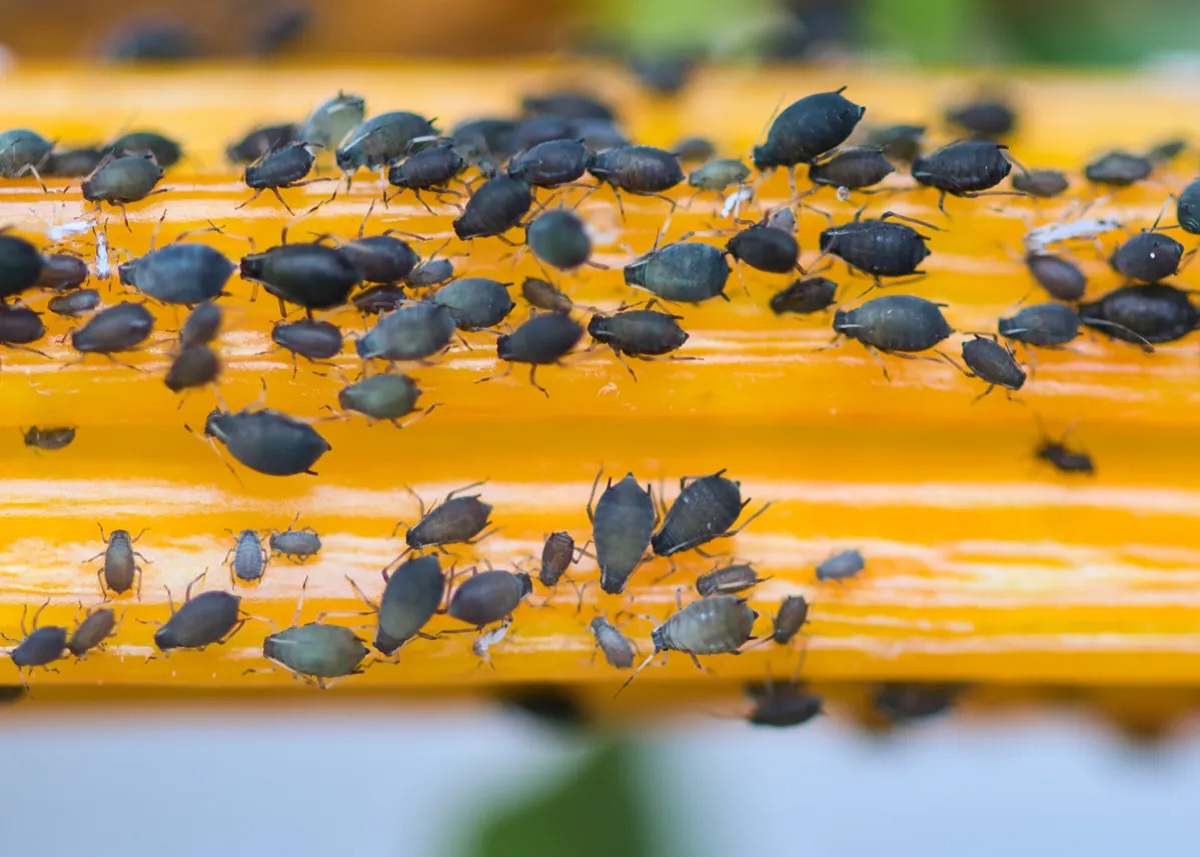
What Are The Little Black Bugs In My Bird Seed?
The little black bugs in your bird seed are often grain beetles, weevils, or other tiny insects attracted to stored seeds. These pests can hide within the seeds and lay eggs, causing larvae to feed inside the grains.
They thrive in warm, dry environments and can reproduce quickly, making infestations grow fast. You may notice tiny holes in seeds, dust-like residue, or small moving insects. Identifying the specific type of bug helps determine the best way to remove them and prevent future infestations.
How Do Bugs Get Into Bird Seed?
Bugs can enter bird seed at multiple stages, starting from harvesting, processing, or packaging. Eggs, larvae, or adult insects may already be present when you purchase the seed.
Once the seed is in your home, improper storage in open bags, warm, or humid areas allows these pests to thrive. Even feeders can attract insects when leftover seed accumulates. Understanding these pathways helps you take preventive measures to keep your seed fresh and safe for birds.
Are These Bugs Harmful To Birds?
Most small black bugs in bird seed are not directly poisonous to birds, but they can pose risks. Infested seeds may contain larvae, bacteria, or mold that can lead to digestive issues or illness.
Insects also reduce the nutritional quality of seeds, which may affect a bird’s health over time. Birds may avoid contaminated seed or struggle to eat it properly. Regular inspection and removing infested seed ensures your birds receive safe, nutritious food.
Can I Save The Seed If It Has Bugs?
Yes, in some cases you can save lightly infested seed. Freezing the seed for 48 to 72 hours kills eggs, larvae, and adult insects without harming the seed’s nutritional value.
Sifting the seed to remove visible bugs or debris is another method for minor infestations. Heat treatment in the oven at low temperatures can also eliminate pests. Always inspect and treat the seed thoroughly before placing it back in feeders. Heavily infested or moldy seed should be discarded to protect your birds.
How Can I Prevent Bugs From Returning?
Prevention begins with proper storage. Keep bird seed in airtight containers made of metal, plastic, or glass to block insects. Store the containers in a cool, dry location to limit warmth and moisture that attract pests.
Regularly rotate seed to avoid keeping older batches for too long. Clean feeders and surrounding areas to remove spilled seeds and debris, which attract bugs. Freezing new seed batches before use can also prevent eggs or larvae from establishing. Combining these strategies keeps your bird seed pest-free.
What Are The Signs That My Bird Seed Is Infested?
Infested bird seed shows multiple signs. You may see tiny black insects moving through the grains or clusters of larvae. Seeds may have small holes, dust-like residue, or clumps caused by webbing from moth larvae.
Other indicators include a musty or sour smell, seed clumping, or unusual discoloration. Birds may avoid feeding or appear restless around the feeder. Observing these signs early allows you to remove contaminated seed and clean feeders before the infestation spreads.
Final Thoughts
Finding unexpected insects in your bird feed can be alarming, but understanding the cause and type of these pests is essential. Small black bugs in bird seed are often weevils, flour beetles, or similar insects that can infest stored seeds, especially when the environment is warm, moist, or improperly sealed. Identifying the bugs correctly helps determine whether the seed is safe for your birds or needs to be discarded.
Learning what are the little black bugs in my bird seed also emphasizes the importance of proper storage and maintenance. Using airtight containers, keeping seeds in cool, dry areas, and regularly checking for signs of infestation can prevent future problems. Regular cleaning of feeders and removing leftover seeds further reduces the chances of attracting pests and ensures a healthier feeding environment.
Addressing what are the little black bugs in my bird seed protects both the birds and the quality of their food. By taking preventive measures and promptly removing infested seed, you can maintain a safe, clean, and nutritious feeding area, supporting the health and well-being of your feathered visitors.